Wednesday, May 28, 2008

PAINT.NET BASICS

First let's start off with a little bit about PAINT.NET. Its is an easy to use, free photo editing software. It is what I use to do all my edits and graphics. You can get it HERE. I am not associated with PAINT.NET in any way. So you will have to go to their site for more in depth questions. I am just a user who thinks PAINT.NET is just the best damn free software I've ever used. Anyway here are some basics that I've learned to help you get started and maybe clear some confusion for you. Let's start with the TOOLS.


  1. Rectangle Select
    You may use this to define a rectangle or square selection region. Read more at Selection Tools.

  2. Move Selected Pixels
    You may use this to move pixels that are currently selected as a result of using the various Selection Tools. Read more at Move Tools.

  3. Lasso Select
    You may use this to draw a freeform selection region. Read more at Selection Tools.

  4. Move Selection
    You may use this to move the selection without affecting the pixels that are selected. Read more at Move Tools.

  5. Ellipse Select
    You may use this to draw an ellipse or circle selection region. Read more at Selection Tools.

  6. Zoom
    This tool can be used to zoom in (left click), zoom out (right click), or zoom the whole canvas around a particular region (draw a rectangle).

  7. Magic Wand
    You may use this to select areas of the active layer that are similar in color.
    Pan
    Using this tool you can scroll, or pan through the image. This functionality is also usable from any other tool at any time: simply hold down the spacebar and then click and drag with the mouse.

  8. Paint Bucket
    This tool is useful for filling in areas of similar color with a different color.

  9. Gradient
    This tool can be used for drawing gradients and fading between images (using the transparency mode).

  10. Paintbrush
    This tool is selected by default when you start Paint.NET, and is useful for many kinds of freeform drawing.

  11. Eraser
    You may use this tool to erase areas of the image (it sets the transparency to 0).

  12. Pencil
    This allows you to edit the active layer pixel-by-pixel. Read more at Pixel Tools.

  13. Color Picker
    You can use this tool to pick up a color from the active layer and set it as the current primary or secondary color. Read more at Pixel Tools.

  14. Clone Stamp
    This tool is useful for copying regions of pixels between layers, or within the same layer.

  15. Recolor Tool
    This tool is useful for replacing one color with another.

  16. Text Tool
    This tool can be used for placing text on the image.
  17. Line / Curve Tool
    You may draw straight lines and curved lines with this tool.
  18. Rectangle
    This can be used to draw rectangles and squares. Read more at Shape Tools.
  19. Rounded Rectangle
    This can be used to draw rounded rectangles and rounded squares. Read more at Shape Tools.
  20. Ellipse
    This can be used to draw ellipses and circles. Read more at Shape Tools.
  21. Freeform Shape
    This can be used to draw a shape with a freeform outline. Read more at Shape Tools.

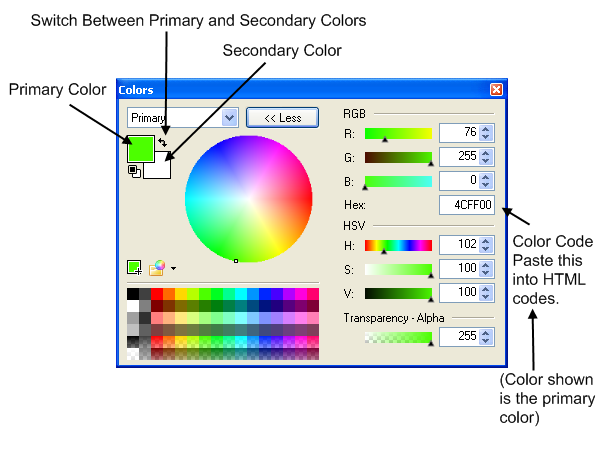
Now on to the Colors Window.

The picture just about says it all. PAINT.NET usually starts up in the LESS window mode. Just click the more button in the colors window to enlarge it like the one shown.

About the Layers Window.

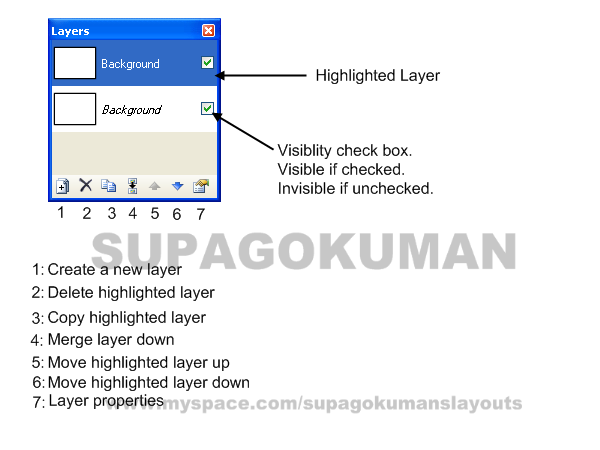
This window allows you to manage the multiple layers that an image may contain in Paint.NET. There is always one active layer, and all drawing affects only that layer. Each layer may be given a name, and may have a blending mode and opacity set. You may also make a layer visible or invisible by setting the checkbox appropriately.
You may think of the layers of an image as representing a stack of transparency sheets placed one on top of the other. Images that are on lower layers will show through to the top, but only if the layers on top do not include them.


  • Add New Layer
    This will add a new, completely transparent layer to the image. It will have a generic name that indicates what layer position it has been placed at, such as "Layer 4."
  • Delete Layer
    This will delete the active layer from the image. You may not delete a layer if it is the only one in the image.
  • Duplicate Layer
    This will take the active layer, duplicate its contents and attributes, and place it in the image after the original layer.
  • Merge Layer Down
    This will take the current layer and merge it into the layer below it.
  • Move Layer Up
    This will move the current layer to a higher position in the layer order.
  • Move Layer Down
    This will move the current layer to a lower position in the layer order.
  • Layer Properties
    This will bring up the properties for the active layer. From here you may give the layer a different name, toggle its visibility, and set its blending properties.

There is only one window left to talk about. The History Window.

This window is where all of the actions you have performed on an image since it was opened will be shown. It consists of a list of actions, and a toolbar for rolling back or forward through the effects of the actions.
Every time you perform an action that changes the image, or when you create or modify a selection, it will be reflected in the History Window. If you have undone any actions, they will show up at the bottom with a grey background and may be redone by using the Redo facility. If you perform a new action, any actions that are redoable will be erased to make way for the new action.


  • Rewind (Undo All)
    This will undo every action that you have performed. If there are many actions in the list, this may take some time to finish.
  • Undo
    This will undo only the last action you performed.
  • Redo
    This will redo the last action that was undone.
  • Fast Forward (Redo All)
    This will redo all the actions that have been undone.


Now for the 3 things people ask me the most. Click the links for the answers.

Where do I get PLUGINS? (More effects)

How do install PLUGINS?

How do I get more FONTS?


Friday, May 23, 2008

FREQUENTLY ASKED QUESTIONS

FREQUENTLY ASKED QUESTIONSTHESE ARE ANSWERS TO ACTUAL QUESTIONS I HAVE RECEIVED


Q. Can I use your codes and try to make my own DIV?

A. Sure, go ahead. Let me know when your finished cause I wanna see!

Q. Can I edit the image of one of your DIVs and use it for my character?

A. Sure, go ahead. Let me know when your finished cause I wanna see!

Q. My comments, messages, add me and pic links aren't working on my DIV layout?

A. Read the instructions on the layout blog.

Q. Will you teach me how to make a DIV layout

A. No, but here are some links that will help you learn how to.

CREATING DIVS

FREE DIV LAYOUTS

DIV LAYOUTS

HTML MASTERS

HTML & CSS SUPPORT

GROUP CODERS

HTML TUTORIALS


Q.Where do I find my friend ID?

A. View your profile. Look at the url. In there you will see friend id=SOME NUMBER. That number is your friend ID.

FRIEND ID EXAMPLE

Q. Can I make a request?

A. I don't do requests anymore. Sorry.

Q. My layout isn't working right what's wrong

A. Did you erase all those old layout codes like I told you? Do that and try again.

Q. Where did you get your layout?

A. I make all my own stuff.

Q. How do I make a layout like yours?

A. You must know a lot about html and image editing.

Q. Will you teach me how to do all that stuff?

A. I posted some tutorials on pic edting. You can learn more about HTML and CSS HERE.

Q. What photo editing program do you use?

A. PAINT.NET

Q. Will you teach me how to edit photos with PAINT.NET?

A. I have posted some tutorials. But there are more PAINT.NET tutorials HERE.

Q. Hey SUPAGOKUMAN you wanna fight?? Or spar? I am king super duper Goku member of B.A.D. *powers up to Super Saiyan 100*

A. You don't want none of this. I'm 6'5" , 230 lbs and I can bench 260 lbs. I'll snap you like a twig. Oh wait a minute, you're a roleplayer. My bad. I DON'T ROLEPLAY. Sorry, just don't have the time for it!

Q.Where do you get those drop down boxes with interests and stuff in them?

A. I got them HERE.

Q. How do you make your video small?

A. Change the height and width numbers in the embed code you get from youtube.

Q. How do you get your video to autoplay?

A. You must add &autoplay=1 to the end of the URLS in the EMBED code. So they will look like this. http://www.youtube.com/v/S8ENwFJBzro&autoplay=1

Q. Will you make me a whore code?

A. No. Use google, search for myspace whore codes. Do it yourself. It's easy!

Q. How do you get your whore code in a box?

A. Go HERE.

Q. Will you make me a banner?

A. No. Use google, search for myspace banners. Do it yourself. It's easy!

Q. Do you have any cool pics you can send me?

A. No use google image search. That's what I do. Or you could join my club, Dragonball Originals.

Q. Can you make me a custom layout for my roleplay character?

A. Sorry, I don't do requests anymore.

Q. Will you edit a pic for me?

A. Sorry, I only do that for my real friends not people that only talk to me when they want something.

Q. Where can I find some cool DBZ pics?

A. Dragonball Originals.

Q. Where is a good place to watch DBZ episodes?

A. Ever heard of a little site called youtube? Try there. Or use google.

Q. How do I put pics and those moving images on my page?

A. Those moving images are called gifs. And you can do that by starting a photobucket account. The rest is explained once you start an account.

Q. How do I put stuff on my myspace blog.

A. On you blog home page click CUSTOMIZE BLOG. The rest is explained there.

Q. How do you make your pics move and flash and stuff.

A. See my tutorial on animating pics.

Q. Where do you get all those pics that say SUPAGOKUMAN on them?

A. DUH!!!!!!!!!! I make them.

Q. Seriously, what site do you use to make your stuff?

A. Are you freakin retarded or something. I DON'T NEED NO STINKIN WEBSITE !

SUPAGOKUMAN'S DIV LAYOUTS STYLE 3

Below there are links to the previews of my Style 3 DIV layouts. Just click the link (for example Goku) and it will show you a preview pic. If you like that pic, click the link beside it that says "CLICK TO GET THE CODE". Now here comes the tricky part. YOU MUST ERASE ALL YOUR OLD MYSPACE CODES FOR THESE LAYOUTS TO WORK. Seriously, I mean everything in the about me, who I'd like to meet, interests, movies, music, books, heroes, all of it. Then copy the codes and put them in the correct section. DIVs are not like regular layouts. This DIV does not have navagation links and also does not have a friends section. You will need to find the areas like Box 1 title or Box 1 content and type over them for your words, pictures, etc to appear in th boxes. If you want to put navagation links on your profile, you just need to put in hyperlinks. Click HERE to learn how to make hyperlinks. But don't worry, your USER SHORCUTS drop down box will still be on your page so your friends can use it to contact you. Finally, if you want your friends section to be in box 4, then simply erase the contents of box 4, then erase THIS line of code in your about me section.


Bardock----------CLICK TO GET THE CODE

Broly----------CLICK TO GET THE CODE

Goku----------CLICK TO GET THE CODE

Trunks----------CLICK TO GET THE CODE

Vegeta----------CLICK TO GET THE CODE

Android 18----------CLICK TO GET THE CODE

Naruto----------CLICK TO GET THE CODE

Sasuke----------CLICK TO GET THE CODE

Itachi----------CLICK TO GET THE CODE

Shikamaru----------CLICK TO GET THE CODE


IF YOU WANT TO SUPPORT MY SITE BY ADDING A BANNER TO YOUR PAGE THEN COPY THE FOLLOWING CODE AND PUT IT ON YOUR PAGE. THANKS!


Monday, May 19, 2008

SUPAGOKUMAN'S DIV LAYOUTS STYLE 2

Below there are links to the previews of my Style 2 DIV layouts. Just click the link (for example: SSJ3 Goku)and it will show you a preview pic. If you like that pic, click the link beside it that says "CLICK TO GET THE CODE". Now here comes the tricky part. YOU MUST ERASE ALL YOUR OLD MYSPACE CODES FOR THESE LAYOUTS TO WORK. Seriously, I mean everything in the about me, who I'd like to meet, interests, movies, music, books, heroes, all of it. Then copy the codes and put them in the correct section. Then, you'll have to paste your friend ID number everywhere it says PUT FRIEND ID HERE. Be sure to do this before you save your code for the first time, because myspace will turn the links into msplinks and you won't be able to insert your friend ID. If you don't do this, your navigation links (add message, comment, etc..)WILL NOT work! Also put whatever you want where it says put stuff here. And that's it, you're done.


Bojack----------CLICK TO GET THE CODE

SSJ Goku----------CLICK TO GET THE CODE

Majin Vegeta----------CLICK TO GET THE CODE

Bardock----------CLICK TO GET THE CODE

Bulma----------CLICK TO GET THE CODE

Kid Chi Chi----------CLICK TO GET THE CODE

Future Gohan----------CLICK TO GET THE CODE

Frieza----------CLICK TO GET THE CODE

Fasha----------CLICK TO GET THE CODE

Cooler----------CLICK TO GET THE CODE

Cell----------CLICK TO GET THE CODE

Super Android 13----------CLICK TO GET THE CODE

Gohan----------CLICK TO GET THE CODE

Yamcha----------CLICK TO GET THE CODE

Videl----------CLICK TO GET THE CODE

Naruto Uzumaki----------CLICK TO GET THE CODE

Sasuke Uchiha----------CLICK TO GET THE CODE

Sakura Haruno----------CLICK TO GET THE CODE

Shino Aburame----------CLICK TO GET THE CODE

Ichigo Kurosaki----------CLICK TO GET THE CODE

Evil Ichigo----------CLICK TO GET THE CODE

Masked Ichigo----------CLICK TO GET THE CODE

Toshiro Hitsugaya----------CLICK TO GET THE CODE

Gin Ichimaru----------CLICK TO GET THE CODE

Edward Elric----------CLICK TO GET THE CODE

Pirate Girl----------CLICK TO GET THE CODE


IF YOU WANT TO SUPPORT MY SITE BY ADDING A BANNER TO YOUR PAGE THEN COPY THE FOLLOWING CODE AND PUT IT ON YOUR PAGE. THANKS!


SUPAGOKUMAN'S DIV LAYOUTS STYLE 1

Below there are links to the previews of my Style 1 DIV layouts. Just click the link (for example: SSJ3 Goku)and it will show you a preview pic. If you like that pic, click the link beside it that says "CLICK TO GET THE CODE". Now here comes the tricky part. YOU MUST ERASE ALL YOUR OLD MYSPACE CODES FOR THESE LAYOUTS TO WORK. Seriously, I mean everything in the about me, who I'd like to meet, interests, movies, music, books, heroes, all of it. Then copy the codes and put them in the correct section. Then, you'll have to paste your friend ID number everywhere it says PUT FRIEND ID HERE. Be sure to do this before you save your code for the first time, because myspace will turn the links into msplinks and you won't be able to insert your friend ID. If you don't do this, your navigation links (add message, comment, etc..)WILL NOT work! Also put whatever you want where it says put stuff here. And that's it, you're done.


Android 18----------CLICK TO GET THE CODE

Broly----------CLICK TO GET THE CODE

Cell----------CLICK TO GET THE CODE

Chichi----------CLICK TO GET THE CODE

King Cold----------CLICK TO GET THE CODE

King Vegeta----------CLICK TO GET THE CODE

Nail----------CLICK TO GET THE CODE

Pan----------CLICK TO GET THE CODE

Vegeta SSJ----------CLICK TO GET THE CODE

Vegeta SSJ4----------CLICK TO GET THE CODE

Gogeta----------CLICK TO GET THE CODE

Gogeta SSJ4----------CLICK TO GET THE CODE

Gohan SSJ2----------CLICK TO GET THE CODE

Goku SSJ2----------CLICK TO GET THE CODE

Goku SSJ3----------CLICK TO GET THE CODE

Goku SSJ4----------CLICK TO GET THE CODE

Trunks----------CLICK TO GET THE CODE

Videl----------CLICK TO GET THE CODE

Super Android 17----------CLICK TO GET THE CODE

Naruto----------CLICK TO GET THE CODE

Itachi----------CLICK TO GET THE CODE

Sasuke----------CLICK TO GET THE CODE

Gaara----------CLICK TO GET THE CODE

Kakashi----------CLICK TO GET THE CODE

Neji----------CLICK TO GET THE CODE

Rock Lee----------CLICK TO GET THE CODE

Sakura----------CLICK TO GET THE CODE

Shikamaru----------CLICK TO GET THE CODE

Tsunade----------CLICK TO GET THE CODE

Yondaime----------CLICK TO GET THE CODE

Akuma----------CLICK TO GET THE CODE

Axel----------CLICK TO GET THE CODE

Ichigo----------CLICK TO GET THE CODE

Roxas----------CLICK TO GET THE CODE

Sora----------CLICK TO GET THE CODE

Spiderman----------CLICK TO GET THE CODE

Zolo----------CLICK TO GET THE CODE


IF YOU WANT TO SUPPORT MY SITE BY ADDING A BANNER TO YOUR PAGE THEN COPY THE FOLLOWING CODE AND PUT IT ON YOUR PAGE. THANKS!